

Easy Steam Push (Auto Build & Deploy)
Automation plugin for packaging and pushing builds to Steam.
Overview
Easy Steam Push is an automation tool that eliminates the manual packaging and SteamPipe upload routine. Perfect for both daily development iterations and final Shipping releases, allowing you to push builds to the live branch with a single click.
Detailed Setup and Launch Guide
Follow these steps to configure the plugin and start pushing builds to Steam directly from the Unreal Editor.
SteamCMD Configuration
SteamCMD is a mandatory requirement for interacting with Steamworks. You have two ways to set it up:

Option A: Automatic (Recommended)
Click the Install SteamCMD (Auto) button. The plugin will automatically download, extract, and configure all necessary components in the background.
Option B: Manual Installation
If the automatic method fails or you prefer manual control:
- Visit the Official SteamCMD Wiki.
- Scroll to the Windows section and download
steamcmd.zip. - In the plugin settings, click Manual and select the downloaded ZIP archive.
- The plugin will automatically extract it to the correct folder.
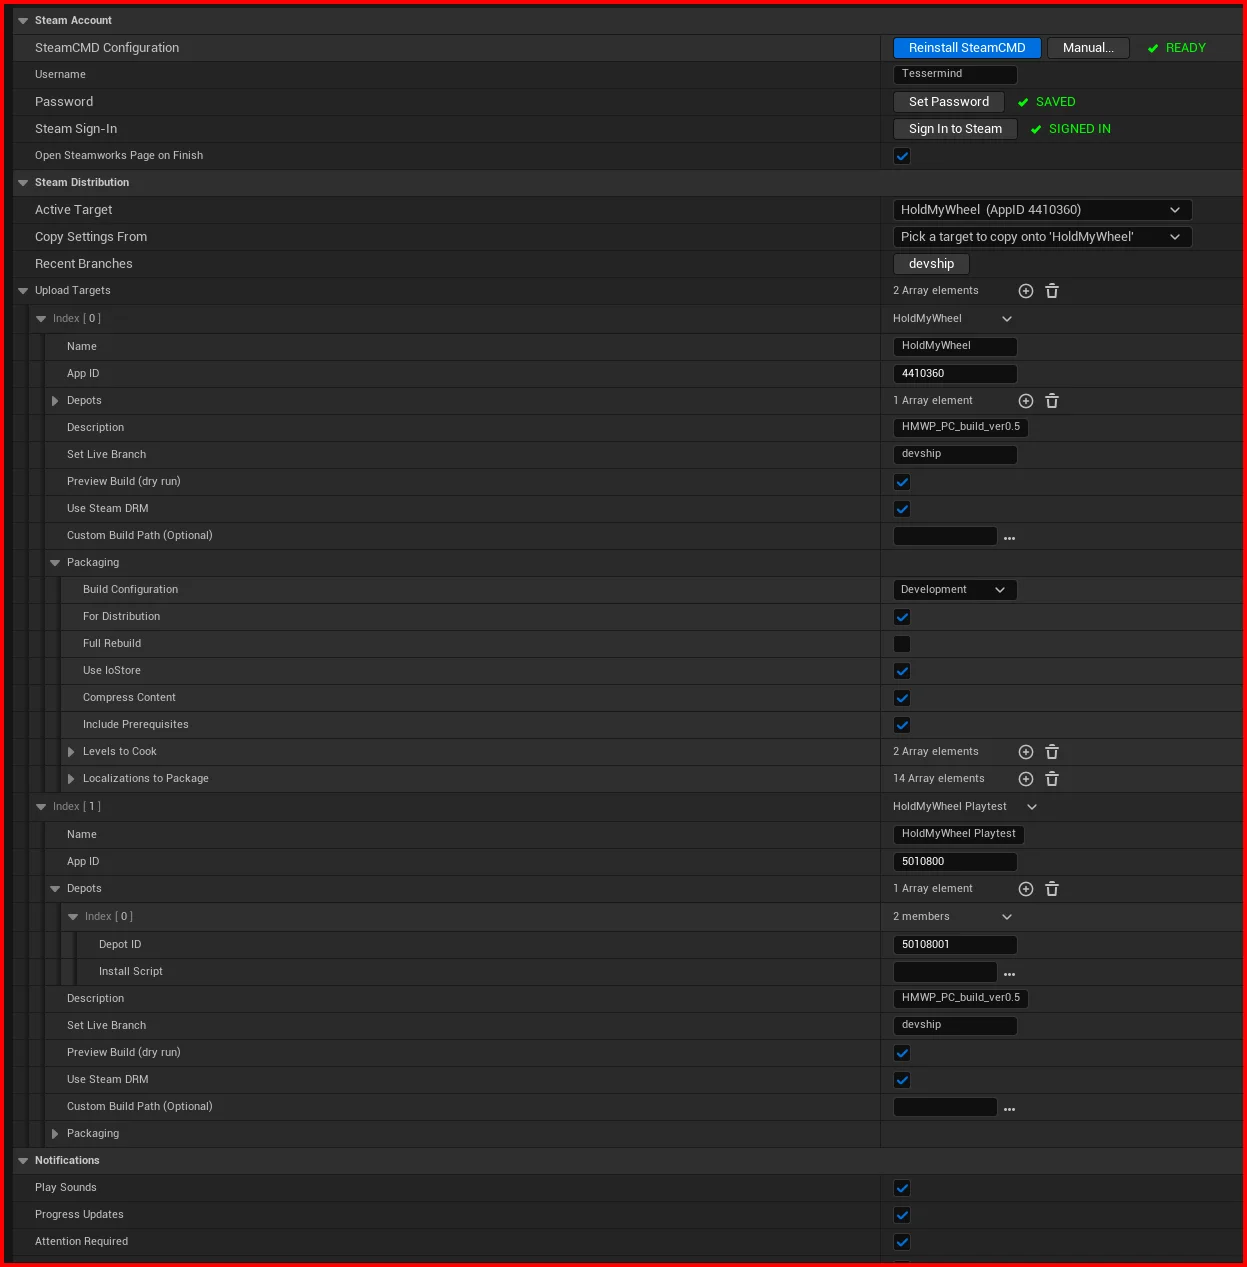
The main settings interface for Steam account, depots, and packaging rules.
Step 1: Plugin Installation
Recommended method: Create a Plugins folder in your project's root directory and copy the EasySteamPush folder there.
You can find this folder in the Marketplace/Plugins section of your engine version after downloading it from the Marketplace and adding it to the engine.
Open Unreal Engine and go to Edit -> Plugins. Ensure the Easy Steam Push plugin is activated (it will activate automatically if added directly to the project's Plugins folder).
Step 2: Account and Upload Targets
Open Project Settings → Plugins → Easy Steam Push.
- Login: Enter your Steam username and password.
- Upload Targets: Each entry is one destination — the main game, a playtest app, a demo. The Name is what the toolbar shows.
- App ID: That target's Application ID from Steamworks. A playtest and a demo are separate apps with their own IDs.
- Depots: Add the Depot ID, typically
App ID + 1. - Set Live Branch: A beta branch that already exists in Steamworks (App Admin → Builds). Leave empty for a first upload or the default branch — Steam only sets the default branch live by hand. The plugin validates this field before packaging.
- Preview Build (dry run): SteamCMD scans and reports but publishes nothing. While on, the toolbar button shows (Preview).
- Active Target: The target the toolbar button pushes to. The same list is on the arrow next to the button.
- Copy From (in each entry's header) fills the target in from another one. App ID and depots are never copied; a target added with + starts as a copy of the active one.
Projects updated from an earlier version keep working: the old single-target settings become the first target automatically.
Step 3: Sign In Once
Click Sign In to Steam. It runs a SteamCMD login without building anything: a wrong password or a Steam Guard problem shows up in seconds, and a successful sign-in caches the session so the upload will not stop for Steam Guard.
Step 4: Packaging Settings
Packaging lives inside each target: a demo can ship in Shipping with two maps while a playtest stays in Development with everything.
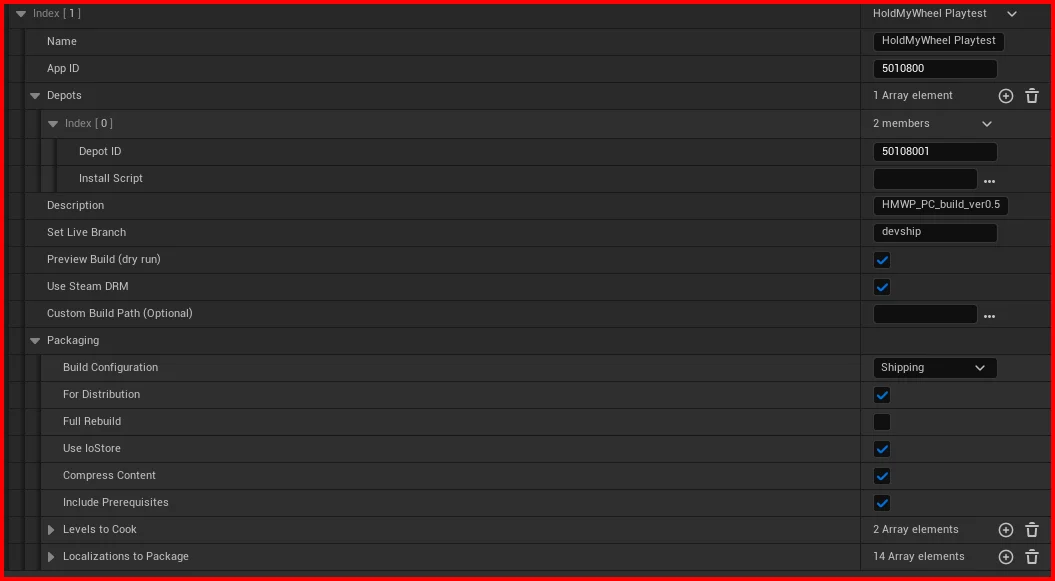
- Build Configuration:
Development,Shipping, orDebug. - Parameters:
For Distribution,Full Rebuild,Use IoStore,Compress Content. - Use Steam DRM: Optional; requires
Shipping(greyed out otherwise). If the server-side wrap fails, the build is still uploaded without DRM, with a warning. - Custom Build Path: Optional. When empty, the first target packages into
Saved/EasySteamPush/Buildand every other target into a subfolder named after it. - Levels to Cook / Localizations: The maps and languages to include; empty means everything.
Step 5: Push
Click the toolbar button. The plugin packages, signs in, uploads, and reports exactly what Steam asks for during sign-in: an email code, a Mobile Authenticator code, or an approval in the Steam Mobile App with nothing to type.
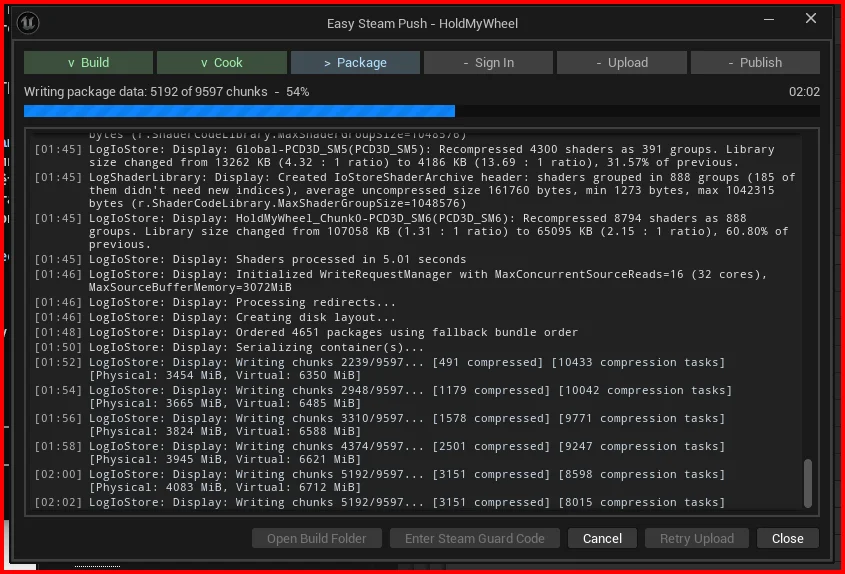
Step 6: Watching the Progress
The progress window is not modal — the editor stays usable, and closing the window does not stop the push.
- Step strip:
Build → Cook → Package → Sign In → Upload → Publish. Green when done, blue while running, red on failure. - Log: timestamped and color-coded, mirrored to the Output Log, ending with a
PUBLISH COMPLETE/PUBLISH FAILEDbanner and the total time. - Notifications: four groups in the settings — Progress, Attention Required, Successes, Failures — plus a Play Sounds master switch.
Uploading an Existing Build
If packaging succeeded but the upload did not, the build on disk is still valid: use Retry Upload in the progress window, or Upload Existing Build from the toolbar arrow later. The plugin confirms first if the build was packaged for a different App ID or changed on disk since.
The Toolbar Menu
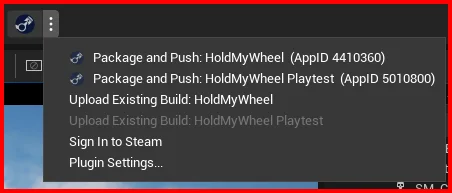
- Package and Push: <target> — cooks and uploads to that target, and makes it the active one.
- Upload Existing Build: <target> — uploads that target's packaged build, no cook. Greyed out when nothing is packaged yet.
- Sign In to Steam and Plugin Settings…
Frequently Asked Questions
The plugin uses standard Unreal Engine build parameters. If the build fails, try to use the native Package Project tool. If it fails there too, the issue is likely within your project logic or blueprints, not the plugin.
First check what the plugin says it is waiting for — Steam decides whether to send a code by email, ask for one from the Mobile Authenticator, or request an approval in the app, and the progress window reports whichever one it actually chose. If it is waiting on the mobile app and nothing appears, close and reopen the Steam app on your phone to refresh the Steam Guard status; this is a known behavior of SteamCMD.
No. Use Retry Upload in the progress window, or Window → Upload Existing Build later. Only the upload is repeated; the packaged build is reused as it is.
No. All required components are managed by the plugin. Simply click the download button in the plugin settings as described in Step 2 of the guide.
Since version 2.5 the password is encrypted with Windows DPAPI before being saved, which ties it to your Windows user account — the stored value cannot be decrypted on another machine or by another user. It is only used to authenticate the SteamCMD session, and it is handed to SteamCMD over standard input rather than on the command line, so it never appears in the process list while the upload runs. Passwords saved by earlier versions are migrated to the encrypted format automatically.
The password is stored per project, while the signed-in SteamCMD session is shared by every project of your Windows user. That is why a brand new project can show NOT SET (using cached session) in yellow and still sign in without asking for anything: nothing is stored there yet, and nothing has to be until the session expires. Save the password in that project when it does.
A branch (Steam also calls it a beta) is a named channel of your app that players can switch to — demo, playtest, an internal QA build. Set Live Branch tells the plugin which one to release the uploaded build to.
Branches are not created by the upload. You create them yourself in Steamworks under App Admin → Builds → Betas. Typing a name that does not exist there does not make it — Steam accepts the whole upload, transfers every file, and only then refuses to commit, reporting nothing more useful than Failed to commit build. The plugin warns you before that happens: “This target has not published to branch '…' before.” If you see it and the branch really is new, create it in Steamworks first.
The name must match exactly, including case, and cannot contain spaces. The default branch is a special case: Steam sets it live only by hand in App Admin, never from SteamCMD — so leave Set Live Branch empty to upload the build and release it yourself from Steamworks.
It requires the target's Build Configuration to be Shipping. The wrap runs on Steam's servers, and the larger executables of other configurations exceed Steam's time limit. If the wrap fails anyway, the build is still uploaded without DRM, with a warning.
No. Since 3.5 SteamCMD and its session live in a per-user folder outside the plugin and the project, so they survive plugin updates and deleting Saved. An existing installation is migrated automatically.
Builds are published for Unreal Engine 4.26, 5.0, 5.4, 5.5, 5.6, 5.7 and 5.8. Packages for other engine versions remain available from earlier releases of the plugin.